Salesforce Sandbox Strategy and Change Management
You have now worked through the core administration toolkit: keeping the org healthy, shaping the user experience, building automation, separating configuration from hardcoded logic, and proving a change works before it ships. This chapter is about how you move all of that safely once real users, real data, and real business processes depend on the org.
Sandbox strategy and change management turn good administration into a repeatable operating model. In this article, you will define the purpose and cadence for each sandbox, refresh and validate environments with discipline, compare orgs before deployment, write the release runbook that carries one tested change into production, protect production adjacent data, and connect release governance to day to day delivery without slowing teams down.
🧪 Sandbox Strategy & Change Management
Section titled “🧪 Sandbox Strategy & Change Management”🧱 Sandbox Types & Lifecycle
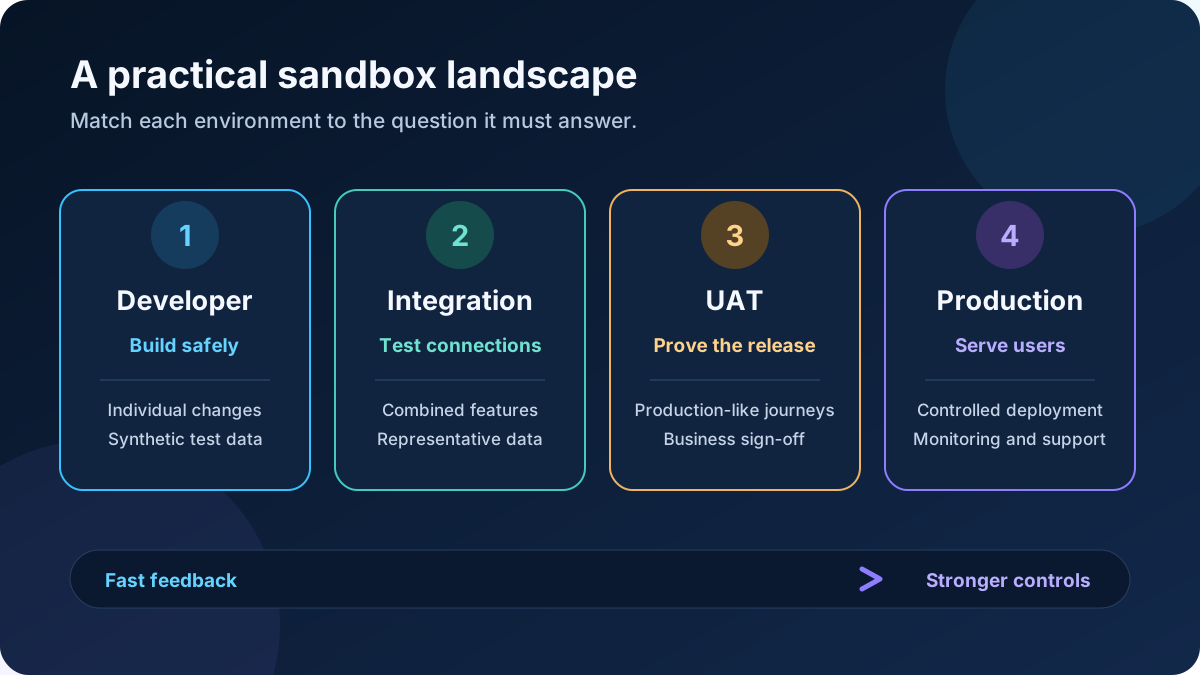
Section titled “🧱 Sandbox Types & Lifecycle”Sandboxes are isolated copies of your production org where you can build, break, and test without impacting real users. They’re your primary safety net for change management, so you want a deliberate mix—not “whatever’s available”.
Salesforce offers four core sandbox types:
| Type | Data Copy | Refresh Interval | Typical Use Case |
|---|---|---|---|
| Developer | Metadata only (no production data) | 1 day | Individual development, proofs of concept, configuration experiments |
| Developer Pro | Metadata only, higher data/file storage | 1 day | Development, quality assurance, training with small data sets |
| Partial Copy | Metadata + sampled production data (template) | 5 days | Integration tests, user acceptance testing (UAT) with a data subset |
| Full | Metadata + full (or templated) production data | 29 days | Pre-prod/UAT, performance, high risk changes |
Choose the mix against your sandbox entitlements. A Full sandbox is included with Unlimited and Performance editions, but is a paid addition for Enterprise and unavailable in Professional. The pattern below assumes you have the required licences; use the types available to you and record any limits on what their data can prove.
A practical pattern for many teams:
- Developers: 1 Developer (or Dev Pro) sandbox per dev as their personal feature environment.
- Integration: 1 Partial Copy as the shared “system integration” environment.
- UAT: 1 Full sandbox as the pre-production environment for business testing.
- Training/compliance: Optional Full or Partial with masked data for demos and audits.
🔄 Sandbox Refresh Lifecycle & Governance
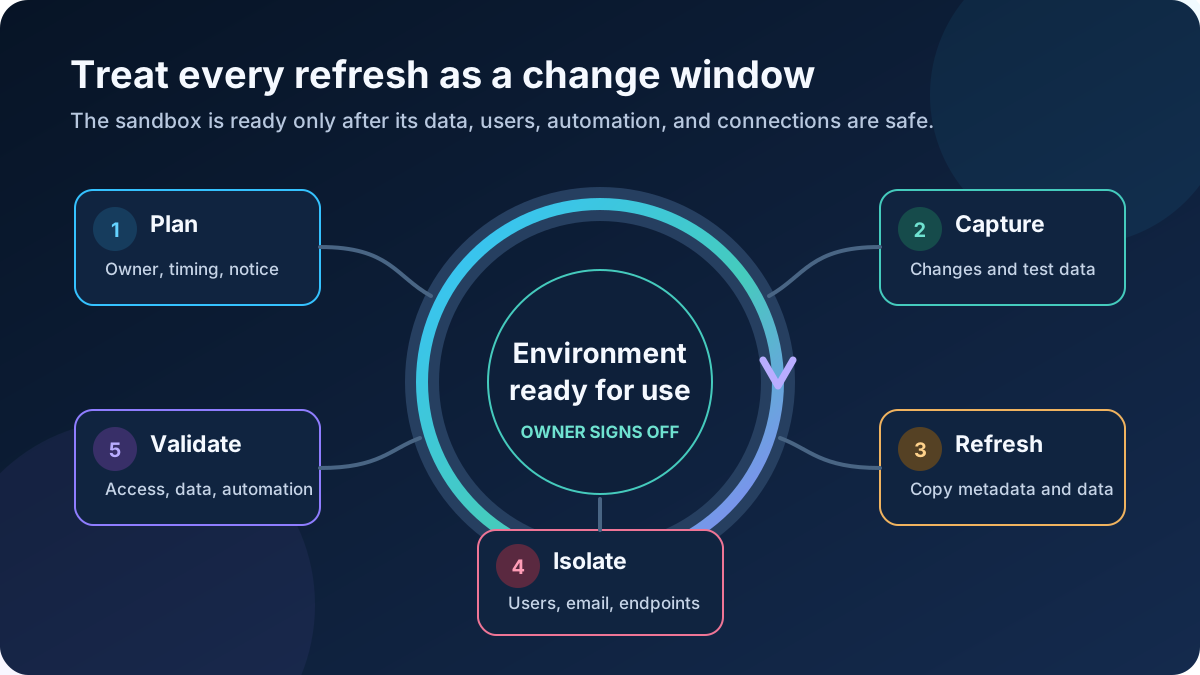
Section titled “🔄 Sandbox Refresh Lifecycle & Governance”Refreshing a sandbox prepares a fresh copy of metadata (and, for Partial/Full, data) from production. Activating that replacement is the disruptive step: it deletes the previous sandbox’s local changes and handcrafted test data. Plan the copy and the handover separately so nobody loses work while waiting for the refresh to finish.
Pre-refresh checklist
- Communicate: Let impacted teams know at least 24-48 hours in advance and confirm no critical testing is scheduled during the window.
- Capture changes: Ensure all metadata changes are committed to source control and/or deployed out of the sandbox.
- Protect integrations: Pause any scheduled jobs or external integrations that call the sandbox, especially if they rely on specific data.
- Agree on timing: Plan activation for off hours or a quiet period in your sprint cadence, and start the copy far enough ahead to allow for delays.
Refresh steps
-
Start from production. Go to Setup → Sandboxes and click Refresh next to the sandbox.
-
Choose the data to copy. Select a sandbox template for a Partial Copy sandbox. For a Full sandbox, a template is optional if you want to limit the data copied.
-
Choose when the replacement takes over. The existing sandbox stays available until the replacement is activated either way; Auto Activate decides who picks that moment. Ticked, activation happens the instant the copy completes, which could be minutes or days away and is not something you can schedule. Unticked, the copy waits for you to click Activate, and you have 30 days before Salesforce deletes an unactivated replacement. Leave it unchecked for a controlled handover.
-
Choose who can use the replacement. Create or review a public group in production containing the people who need access, with its members added as individual users. Select that group under Sandbox Access. A group is required for Developer and Developer Pro sandboxes; Partial Copy and Full also offer All Active Users. With Selective Sandbox Access, the sandbox creator and group members have access, while the remaining users are frozen. Check the membership before continuing: an empty group leaves only the creator with access.
-
Start the copy and monitor it. Confirm the remaining options and click Create. Copying can take minutes to several days, and Salesforce does not guarantee a completion time. The refresh timing guidance explains the effects of queue demand and org size. With Auto Activate unchecked, Salesforce emails you when the replacement is ready to activate.
-
Activate during the agreed window. Confirm that nobody needs the old sandbox’s remaining changes or test data, then return to Setup → Sandboxes and click Activate next to its name. Activation deletes the old sandbox’s configuration and data. Wait for activation to finish before logging in and running the post-refresh checks. If the window has moved and the copy has gone stale, or someone still needs the old sandbox after all, click Discard instead: discarding deletes the replacement and keeps the previous version, and you start again with a new refresh when the timing is right. A discarded copy can’t be recovered, so it is a decision rather than a pause. If you selected Auto Activate instead, this handover happens automatically when the copy finishes, and there is no discard step.
If your older runbook assumes every active production user gets access, this is the change to check: Salesforce began making public-group selection mandatory for Developer and Developer Pro sandboxes in the Sandbox Setup page in Winter ’25. Partial Copy and Full retain the all-active-users option.
Post-refresh validation
Create a small, repeatable checklist:
- Grant additional access where needed: If an authorised user was outside the selected group, open their user detail page in the sandbox under Setup → Users and click Unfreeze. Unfreezing restores access for these users; changing their email address does not.
- Check email delivery separately: Selective Sandbox Access preserves the original email addresses of users granted access through the group. If an authorised user’s address does have an
.invalidsuffix, remove it when they need test emails or a password reset. An address correction restores email delivery; it does not unfreeze the account. - Smoke test login & access: Confirm key roles/profiles can log in and see what they expect.
- Core data checks: Spot check a few critical objects (Cases, Opportunities, key custom objects).
- Integration links: Re-point endpoints and credentials if needed. The custom metadata guide explains how to keep environment-specific values out of hardcoded automation, but you should still run a simple end to end test for every integration.
- Automation & tests: Run key Flows, Apex tests, and critical journeys to make sure nothing obvious is broken. Revisit the automation testing guidance when deciding which Flow paths and failure scenarios belong in the runbook.
Document this in a wiki and treat it as the “post refresh runbook” for whoever owns that sandbox.
Refresh governance
- Limit who can refresh (typically platform owners/admins).
- Maintain a simple refresh calendar (e.g., dev: ad-hoc, integration: monthly, UAT: before major releases).
- For sandboxes holding sensitive data, pair refreshes with data masking or obfuscation jobs.
🚚 Metadata Deployment & Org Comparison
Section titled “🚚 Metadata Deployment & Org Comparison”Deploying changes from sandbox to production requires understanding Salesforce’s metadata model.
Deployment Approaches:
-
Change Sets
- UI driven selection of components; good for smaller, admin led changes.
- Familiar, but harder to reuse and version.
-
DevOps Center
- Salesforce’s own alternative to change sets: work items, a source-controlled pipeline, and point-and-click promotion between stages, built for admins and developers sharing one release path.
- Two versions exist, the original managed package and a next-generation version built on the platform; Salesforce points new teams at the latter.
-
Packages
- Managed or unmanaged packages for app-style bundles and shared components.
- Useful when the same feature ships to multiple orgs or customers.
-
CLI / Metadata API (CI/CD)
- Use the Salesforce CLI (or tools on top of it) to deploy from source control.
- Best fit for teams with branching strategies, pipelines, and automated tests.
For org comparison, lean on:
- Source control diffs (compare branches or tags representing each org).
- CLI based retrieve + diff workflows or third-party tools that visualise metadata differences.
The goal is simple: know exactly what you’re changing before you press deploy.
📋 Change Management: The CI/CD Pipeline
Section titled “📋 Change Management: The CI/CD Pipeline”Modern Salesforce teams manage changes as code using a Continuous Integration/Continuous Deployment (CI/CD) pipeline. Instead of passing change sets between sandboxes, the pipeline uses source control (Git) as the single source of truth and automates deployments.
For Salesforce, a Release Branching Strategy is usually the most practical approach. Because business sign-off (UAT) can take days or weeks, true continuous deployment to production (pushing directly to main for every feature) is rare.
At a high level, your CI/CD pipeline and branching strategy should flow left to right:
Feature Branch → Integration Branch → Release Branch → Main (Production)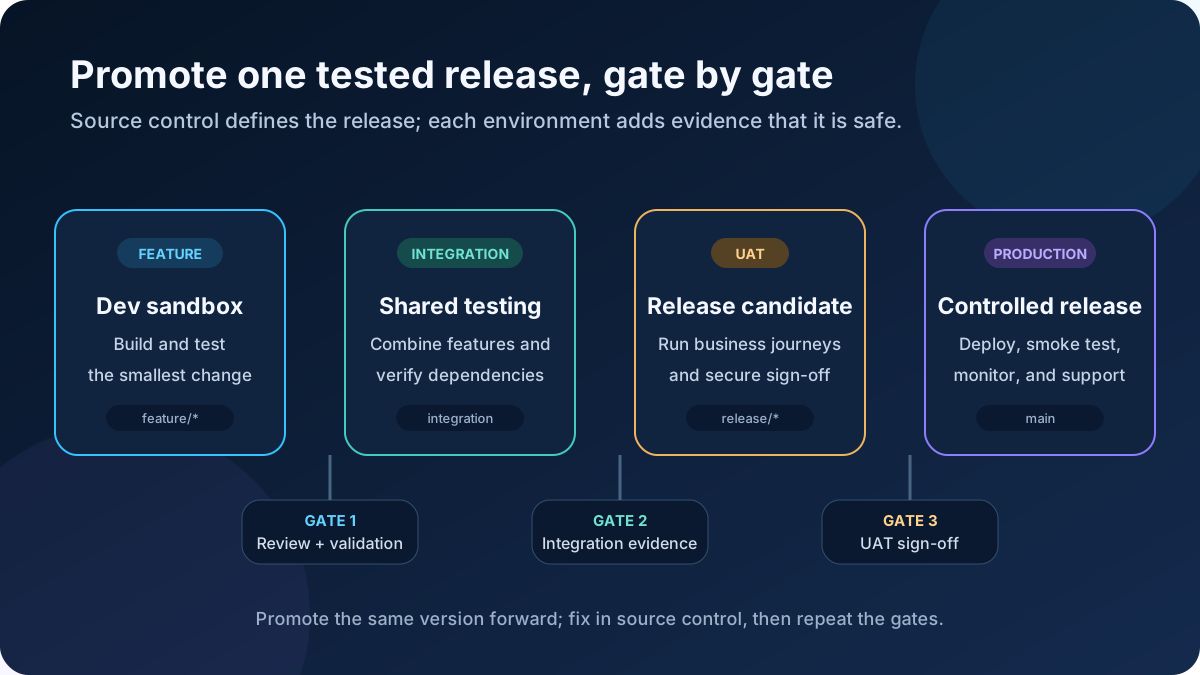
Stage 1: Development (Dev Sandbox & Feature Branch)
- Developers build and iterate in personal Developer sandboxes.
- Work is tracked in a feature branch (e.g.,
feature/expense-approvals) pushed to source control. - Developers use the Salesforce CLI (
sf project deploy start) to sync changes to their sandbox and write unit tests.
Stage 2: Pull Request to Integration
- The developer opens a Pull Request (PR) to merge their feature branch into the
integrationbranch. - CI Automation kicks in: A validation deployment runs against a CI sandbox to compile code and run all Apex tests.
- Code review happens here. Once approved and merged, the CI/CD system automatically deploys the code to the Integration sandbox (Partial Copy).
Stage 3: UAT and the Release Branch
- Once integration testing is complete and a release bundle is ready, a
release/v1.xbranch is cut fromintegration. - Pushing this branch automatically triggers a deployment to the UAT sandbox (Full Copy) for business sign-off.
- Any bug fixes found in UAT are committed directly to the release branch (and later back promoted to
integration).
Stage 4: Production Release
- After UAT sign-off, the release manager opens a PR to merge the
releasebranch intomain. - Merging into
maintriggers the production deployment. - Because the exact same metadata bundle was already tested in UAT, the production deployment is predictable and low risk.
- Post-deployment scripts, flow activation, and manual data steps are executed from a documented release runbook, which the next section writes out for one change.
Trailhead’s short Application Lifecycle Management module puts the sandbox types, development models, and release stages from this section into one picture, and it is the current replacement for the older ALM modules that many guides still link. Pair it with Git and GitHub Basics if version control is new to you; the pipeline above assumes you can read a commit history.
📜 The release runbook: seven questions for one change
Section titled “📜 The release runbook: seven questions for one change”A release runbook records how one tested change reaches production and who looks after it there. Its seven questions cover environment, dependencies, deployment, validation, communication, rollback, and monitoring. Keep the answers alongside the test evidence, sign-off, and rollback trigger. You need them whether you deploy a change set, promote a DevOps Center work item, or merge a release branch.
We’ll use change sets to release the previous chapter’s Resolution Notes field and Case-close validation rule, plus the two follow-up flows and their Follow-Up Date field. The support manager signed off the UAT test plan on 3 September. You are releasing it as the on-call admin from Org Health & Monitoring. The explanations below work through the decisions; the completed table holds the schedule, and the final paragraph adapts it for a pipeline.
Environment: where was it proven, and where is it going?
Section titled “Environment: where was it proven, and where is it going?”Name the source and target, then check whether production has changed since the sandbox refresh. UAT evidence depends on the active Case flows, validation rules, and integration permissions your tests met. A Full sandbox’s 29-day refresh interval leaves plenty of time for production to diverge. Download the Setup Audit Trail history and read the Case changes since the refresh; the Setup page shows only the 20 most recent entries. If something touched the closing transition, re-run the affected test rows or record the gap for the sign-off decision.
Change sets also need a deployment connection authorised in the target org. Check it before the window. Authorising only UAT to upload to production enforces the agreed promotion path.
For this release: the downloaded history shows an edit to the Case compact layout and a change to a case assignment rule since the UAT refresh. Neither touches the closing transition, so the evidence stands.
Dependencies: what has to be true before this works?
Section titled “Dependencies: what has to be true before this works?”List what the change relies on, in the order it must exist. Salesforce will reject a validation rule whose field is missing. It won’t stop you deploying a field that agents cannot see, leaving them unable to satisfy the rule. Package access and layouts deliberately, then check them as a support agent.
Three deployment behaviours deserve a place on that list:
- Profiles and permission sets carry field access differently. Profile settings include custom field permissions only for fields in the change set. Add a Permission Set component as a whole; you don’t select its individual field permissions. Those permissions travel even for fields outside the change set, so every referenced field must exist in the change set or target org. Review the whole component for unintended access changes. This doesn’t mean every setting travels: assigned apps and tab settings are excluded from permission set components.
- Layout assignments can disappear by omission. Deploying a profile and record type without its assigned page layout removes that profile’s existing assignment. Include the assigned layouts when deploying those components. Salesforce’s special behaviour list also covers other traps, including picklist values becoming inactive when omitted from a deployed field.
- Flow activation needs an owner. An active flow arrives in production as a new, inactive version unless Deploy processes and flows as active is enabled in Process Automation Settings. Enabling it also brings the org’s flow test coverage requirement into play. Record the setting and who activates the intended versions, when.
External dependencies determine the sequence too. Test row 6 showed the nightly integration being refused when it closes a case without notes. Its payload must include Resolution_Notes__c, and its user needs read and edit access. The field must exist before that payload ships; the rule must wait until both are ready.
For this release: deploy both fields, the permission set, and both Case layouts first. The integration owner then ships and confirms the payload change. Only then deploy the rule and flows. Optional fields let agents start using notes early without blocking closures. Without the integration confirmation, the second deployment doesn’t go. This org leaves deployed flows inactive for checks before activation.
Deployment: what moves, how, and who presses the button?
Section titled “Deployment: what moves, how, and who presses the button?”Record the component list, method, window, and person deploying. Copy the list from the outbound change set or pull request, then compare it with the dependencies: the tool lists what you selected, not what you forgot. Here, check Follow_Up_Date__c explicitly. The before-save flow stamps it; the after-save flow reads it for the task’s due date. It was built earlier, with the flows, rather than as part of this change, so it is the field most likely to be left off on the assumption that it already exists in production.
Use a validation-only deployment before the window to catch missing dependencies. Validation checks whether the package can deploy, not whether every resulting setting is right: the omitted-layout case above can pass and still remove an assignment.
Production change sets run local Apex tests by default only when they contain Apex classes or triggers. This declarative release would run none by default. Choose Run Local Tests when validating to check existing Apex too: a new validation rule can break test data, including tests that close Cases without Resolution_Notes__c. Finding that now avoids leaving a regression to block a later deployment. Passing tests also makes quick deploy possible if its other requirements are met; a validation without Apex tests doesn’t qualify. UAT still supplies the evidence for user behaviour.
A change set deploys as one transaction: if a component fails, nothing is saved. For the release window, choose a quiet time when the person deploying can stay through the observation period.
For this release: use two change sets matching the dependency sequence. Validate each against production with Run Local Tests before its window, and resolve failures before proceeding. You deploy both; the table below records when.
Validation: how will you know it landed?
Section titled “Validation: how will you know it landed?”Deployment success means the metadata saved. Check the behaviour in production as the people who will use it. Salesforce recommends debugging a moved flow in rollback mode in the destination org, where properties and IDs can differ from the sandbox.
Use a short subset of the test plan, chosen for the failures you need to catch immediately. Keep the result, who checked it, and when, with a screenshot where useful. Confirm the intended flow versions are active before relying on their behavioural checks.
For this release: after the first deployment, log in as a support agent and confirm both fields are visible on the Case page. Also verify the integration user has read/edit access to Resolution Notes through its assigned permissions, before the new payload ships.
After the second deployment, before activating the flows, run row 2 on a purpose-created test case: closing without notes is refused. Run row 3 on a case closed before the release: change a field the rule doesn’t reference, then restore it; both saves should succeed because the rule checks the closing transition. Activate both flows, verify their versions, and run row 1 on a second, still-open test case: close it with notes and check the stamped date and follow-up task. A close-transition flow runs when the save meets its entry conditions, so re-saving the already-closed case would prove nothing. The bulk test remains covered by UAT, subject to the environment comparison above. Record the support manager’s sign-off.
Communication: who needs to know, and when?
Section titled “Communication: who needs to know, and when?”Adoption, Training & Support covers training and helping users through the change. The runbook records release notices, go or no-go, confirmation that it’s live, and any rollback message.
Name the recipients: the support manager owns the go decision, team leads will field agents’ questions, and the integration owner needs to coordinate their change. Give each notice a sender and time. Pre-write the rollback message while you’re calm, saying what changed and what users should do.
For this release: you send the notices to that group and ask the support manager for go or no-go once the integration owner confirms readiness. The rollback message is ready: “Resolution Notes is no longer required while we fix a problem. Close cases as you did before, and add notes where you can.”
Rollback: what would make you reverse it, and how?
Section titled “Rollback: what would make you reverse it, and how?”Carry forward the agreed trigger: closures below 80% of the daily average, or any validation failure in the integration logs. The support manager or on-call admin can call it without a meeting. Now write the reversal for each component:
- Validation rule: untick Active. The rule stays available to switch back on once the cause is understood.
- Flow: activate the previous version, which deactivates the current one. Interviews already running finish on their original version. For a new flow, deactivate it instead.
- Field: leave an optional field in place. If its definition marks it Required, it is universally required, including for API and automation saves; untick Required to reverse that constraint. Avoid deleting it as a rollback: deleted custom fields and their data are recoverable for only 15 days.
- Layouts and permissions: redeploy the previous versions, retrieved before the release using the CLI, DevOps Center’s source control, or a backup tool. Avoid reconstructing them by hand under pressure.
For this release: deactivate the rule and both new flows. The optional fields, layouts, and permissions can stay while the fault is investigated. Keep the previous layouts and permission set available in case those changes also need reversing. Designing this release around optional fields and switchable automation makes the immediate reversal possible without another deployment.
Post-release monitoring: what are you watching, for how long, and who is looking?
Section titled “Post-release monitoring: what are you watching, for how long, and who is looking?”Keep the release open until its observation period ends without a rollback trigger. The Org Health incident showed why: deployment succeeded, but nobody was watching the flow’s fault emails afterwards.
Match each signal to a source. Compare a Case report grouped by close date with the previous four weeks for closure volume. Read the integration’s log for rejected updates, and Paused and Failed Flow Interviews plus the fault-path inbox for automation errors. Route those emails to someone on shift.
The first hour catches agents’ access and layout problems. The first nightly integration run catches failures the daytime checks cannot prove. A week-later review catches slower adoption problems: notes filled with “n/a”, or agents using another status to avoid the rule.
For this release: you watch the flow errors and closure report, the integration owner checks the first overnight run against the new rule, and the support manager reviews notes quality a week later. Each has a deadline in the table. Close the release when all three report and no trigger has fired.
The completed runbook
Section titled “The completed runbook”Keep this summary with the test evidence and the pre-written rollback message:
| Question | This release |
|---|---|
| Environment | Built in NotesDev; proven in FullUAT (Full, refreshed 28 Aug); target production by change set from UAT. Two unrelated Case changes since the refresh; evidence stands |
| Dependencies | Both fields, permission set, both Case layouts → integration payload live and confirmed → validation rule and both flows. Flows arrive inactive; on-call admin activates after initial checks |
| Deployment | On-call admin deploys two change sets: fields/access/layouts Tue 7:30am; rule/flows Thu 7:30am. Validate Mon and Wed respectively with Run Local Tests; resolve failures before deploying |
| Validation | Tue: fields visible as support agent; integration user has read/edit on Resolution Notes. Thu 7:45am: rows 2 and 3 before activation, then activate flows and run row 1 on a fresh open case. Support manager signs off by 8:15am |
| Communication | On-call admin sends Mon notice of both windows to support manager, team leads, integration owner; support manager gives go/no-go Wed 4pm after integration confirmation. On-call admin sends live note Thu 8:20am; prepared rollback message if the trigger fires |
| Rollback | Trigger: closures below 80% of daily average, or any integration validation failure; support manager or on-call admin calls it. Action: deactivate rule and both flows. Prepared: previous layouts and permission set retrieved Mon, before first deployment |
| Post-release monitoring | On-call admin: flow errors until Thu 9:30am, closures report Thu 4pm. Integration owner: log Fri 8am after first 2am run against rule. Support manager: notes quality following Thu. Close when all three report clean |
For a smaller change, most rows shrink to a phrase. The previous chapter’s ten-minute test plan gets a ten-minute runbook to match: source, target, what moves, who checks, what switches it off, and who’s watching.
If you release through a pipeline, record its authorised production connection and compare source versions for environment drift. Two change sets become two pull requests, validated by sf project deploy validate in CI. Check whether the target enables Deploy processes and flows as active: if so, include flow test coverage and adjust the smoke-test order for flows already running. Keep the previous production versions in source control so layouts and permissions can be reverted and redeployed. The sign-off, rollback trigger, and monitoring responsibilities still apply.
🔐 Sandbox Security, Access Control & Isolation
Section titled “🔐 Sandbox Security, Access Control & Isolation”Some sandboxes may contain sensitive data and should be treated as production adjacent, not “throwaway”.
User provisioning & Access control
- Only provision users who genuinely need access; don’t give every user a Full sandbox login by default.
- Grant sandbox access on a need to know basis. Align permissions with roles (e.g., testers get the object/record types they need; developers get broader access in dev sandboxes).
- Review sandbox users regularly and remove access for people who’ve moved teams or left the organisation.
Data sensitivity
- Full and Partial Copy sandboxes pull production data, including personally identifiable information (PII), by default. Use Salesforce Data Mask or equivalent anonymisation tools to obfuscate sensitive fields (names, emails, IDs, financial data) as part of the refresh process where required by policy or regulation. Data Mask requires a paid add-on licence, so confirm availability before making it part of your refresh plan.
- Prefer Developer / Developer Pro sandboxes with synthetic data when real production data isn’t required for the test scenario.
Integration hygiene & Org isolation
- Use sandbox specific credentials, API keys, OAuth clients, and endpoints. Keep production credentials and secrets out of sandboxes.
- Disable or carefully constrain any outbound integrations from sandboxes to avoid impacting real downstream systems.
- Monitor sandbox login and API usage for unusual patterns, especially in environments that contain masked but still business sensitive data. The org health and monitoring guide covers Login History and the operational checks that help make this review repeatable.
📊 Governance: Sandbox Stewardship, Naming & Documentation
Section titled “📊 Governance: Sandbox Stewardship, Naming & Documentation”A bit of structure around sandboxes makes life easier for admins, developers, and auditors.
Naming and Ownership
Section titled “Naming and Ownership”A sandbox name is 10 characters or fewer, and Salesforce appends it to every username in the copy, so the name can only carry a short code and shorter is kinder to everyone who logs in. Pick a pattern that fits, such as purpose plus stage (NotesDev, IntTest, FullUAT), and keep the descriptive label, team, and owner in the register described below rather than trying to squeeze them into the name. Avoid names like Dev1 or Test that tell nobody what the sandbox is for.
Assign each sandbox to a team and a named owner (such as the platform lead for that domain). The owner is responsible for access approvals, refresh scheduling, and post refresh validation. To track this, maintain a simple register (like a wiki page or spreadsheet) listing each sandbox alongside its owner, purpose, and refresh cadence.
Access and Lifecycle Management
Section titled “Access and Lifecycle Management”Manage sandbox access using a lightweight process where a user requests access, the sandbox owner approves it, and an admin provisions it. Log these requests to maintain an audit trail of who has access to which datasets, and review this access at least quarterly to remove users who no longer need it.
When a sandbox has served its purpose and is no longer needed, communicate the decommissioning to the owning team, export any critical test data or logs, and delete the sandbox to reclaim licences and reduce your security surface area.
Sandbox Documentation
Section titled “Sandbox Documentation”For each active sandbox, maintain documentation covering the following details:
- Purpose & Owner: What the sandbox is for (e.g., dev, integration, UAT) and who to contact about access or issues.
- Data Profile: Whether it contains a full copy, partial template, or config only, and if the data is masked.
- Refresh Schedule: How often it’s refreshed and from which source environment.
- Integrations: Which external systems it connects to and which are currently active.
- Known Quirks: Any known data gaps, masking side effects, or limitations.
🧠 Final Thoughts
Section titled “🧠 Final Thoughts”This chapter closes the ground that admins and developers share. You gave each sandbox a purpose and a refresh cadence, chose how metadata moves between orgs, followed a change through a branching pipeline, and wrote the release runbook that carries one tested change into production: environment, dependencies, deployment, validation, communication, rollback, and what to watch afterwards. Then you looked at the sandboxes themselves as production-adjacent systems, with the access controls, masking, ownership, and documentation that status deserves.
Reliable change management is what lets a team improve the org quickly without turning every change into a production risk. Sandboxes, release controls, validation, and rollback discipline work when they are shared habits rather than one person’s checklist, and the runbook is how a habit gets written down so that somebody else can run it.
If you keep one thing from this chapter, keep the runbook table. Fill it in for the next change you ship, however small, and notice which row you couldn’t answer. That row is the one to fix before you deploy.
🚀 Next steps
Section titled “🚀 Next steps”This chapter is where the admin and developer paths separate. Everything before this point is shared ground: reading an org, shaping its interface, automating it, managing its configuration, testing a change, and releasing it safely. What follows is admin work.
- Continuing as an admin? Salesforce Approval Processes is next, covering how to design, configure, and govern approvals that route the right work to the right people without becoming a bottleneck.
- Reading this as a developer? This is your stop point in this section. The chapters after it are admin responsibilities you will not be building against, so return to the Salesforce Developer Journey for the route onward, or go straight to The Developer Mindset & Toolkit, which sets up a local development environment, explains when code is the right tool, and steps into the workflow professional Salesforce developers use every day.
- Thinking further ahead? Understanding the Role of a Salesforce Architect explains where that path leads and what experience it expects you to gather first.