Salesforce Development UI Fundamentals: Understanding Visualforce
Published 01/10/2025 & Updated 18/05/2026

In the Evolution of Frameworks we traced Salesforce’s UI progression from early S-controls through Visualforce and Aura to Lightning Web Components. This article is the first detailed guide in that series, focused on understanding, maintaining, and evaluating Visualforce in modern orgs.
Visualforce launched in 2008 and remained Salesforce’s primary custom UI framework for many years. For most new UI work today, Lightning Web Components are the default choice, but Visualforce still appears regularly in established orgs, especially in PDF generation, legacy overrides, embedded pages, and older email template patterns. In my experience, these pages often survive not because teams love maintaining them, but because they still solve a specific problem reliably enough that migration has never reached the top of the backlog.
If you join an existing Salesforce team, there is a chance you will inherit some Visualforce. Understanding how it works helps with maintenance, troubleshooting, risk assessment, and migration planning. Because Salesforce ships three major releases each year, treat version-sensitive implementation details in this guide as accurate to the review date above and cross-check the official Salesforce release notes where behaviour may have changed.
🧰 Prerequisites and Dev Setup
Section titled “🧰 Prerequisites and Dev Setup”Before creating or editing Visualforce pages, set up a safe development environment first. I strongly recommend using a Developer Edition org for learning and a sandbox or scratch org when maintaining existing pages, controllers, or overrides in an established org. This way you can experiment freely without risking data or functionality in a production org. Visualforce development is not as fast as Aura or LWC, so having a dedicated org for testing and learning is especially helpful.
What you need:
- A Salesforce org you can safely develop in, such as a free Developer Edition org, sandbox org, or a scratch org created with Salesforce DX. Developer Edition orgs are free, provide full access to Visualforce development, and you can sign up at developer.salesforce.com.
- Salesforce CLI (
sf) installed locally for deploying pages from your project. - VS Code with the Salesforce Extension Pack. This gives you syntax highlighting for
.pagefiles, integrated deployment, and autocomplete for Visualforce tags.
Where Visualforce pages live in your project:
In a standard SFDX project structure, Visualforce pages and their metadata sit under:
force-app/main/default/pages/├── MyPage.page ← The Visualforce markup├── MyPage.page-meta.xml ← Metadata (API version, availability)The -meta.xml file controls the page’s API version and whether it’s available for use in Lightning:
<?xml version="1.0" encoding="UTF-8"?><ApexPage xmlns="http://soap.sforce.com/2006/04/metadata"> <apiVersion>66.0</apiVersion> <availableInTouch>true</availableInTouch> <confirmationTokenRequired>false</confirmationTokenRequired> <label>MyPage</label></ApexPage>Quick access in the browser:
You can also create and edit Visualforce pages directly in Setup. Navigate to Setup → Visualforce Pages to see all pages in the org. For rapid prototyping, the Developer Console (accessible from the gear icon) lets you create pages and preview them instantly.
🏗️ Visualforce Architecture: Server-Side Rendering
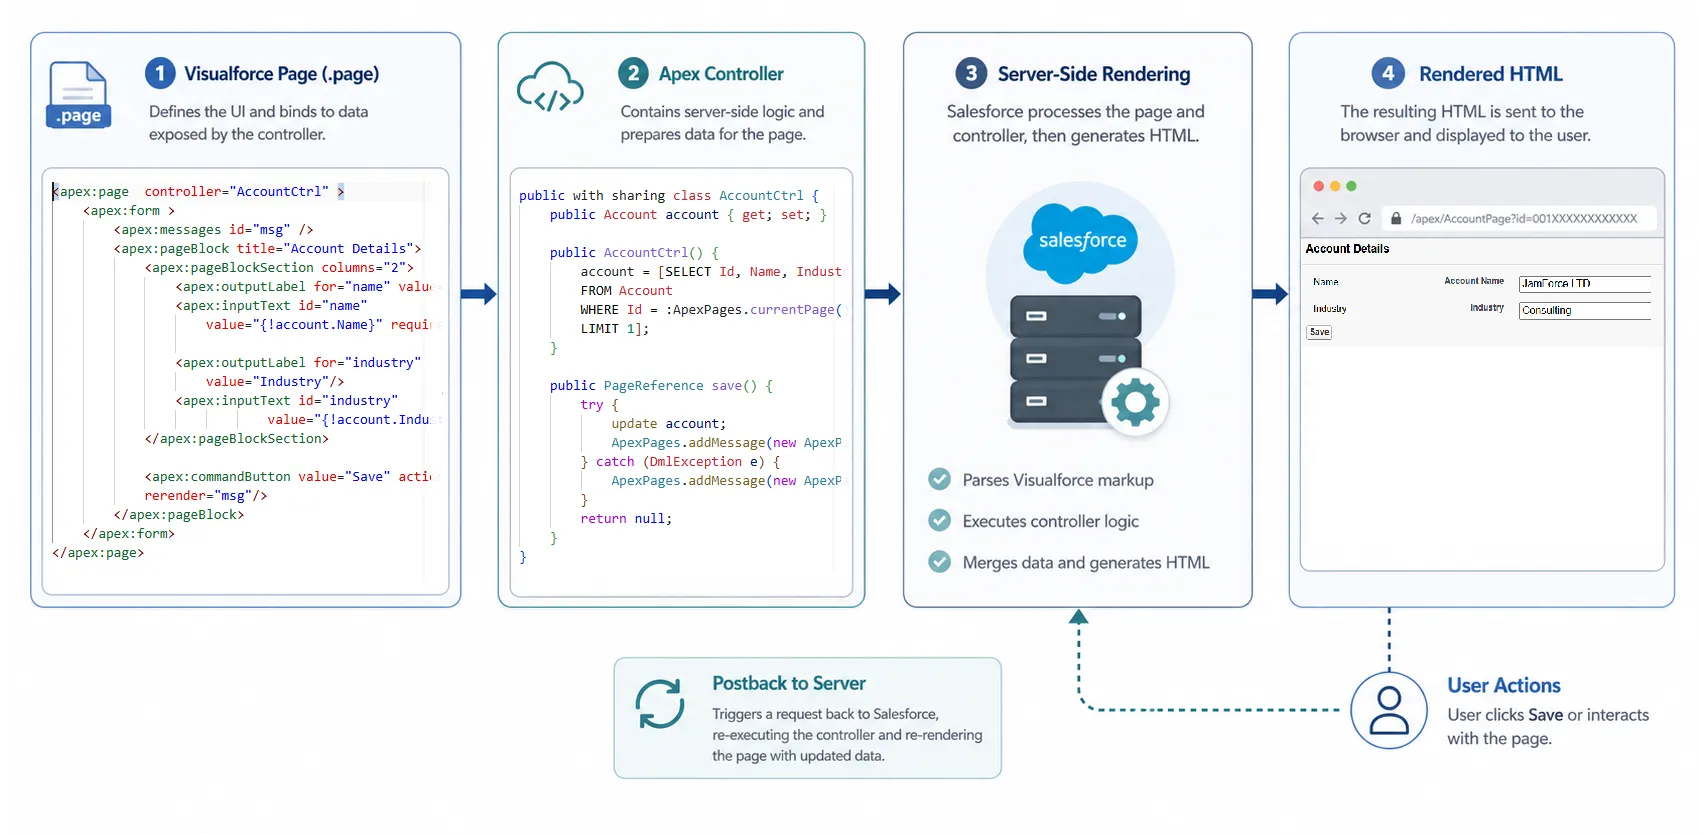
Section titled “🏗️ Visualforce Architecture: Server-Side Rendering”The single most important thing to understand about Visualforce is that it follows a server-side rendering model. When a user navigates to a Visualforce page, here is what happens:
- The browser sends a request to the Salesforce server.
- The server executes any controller logic (Apex code) associated with the page.
- The server renders the Visualforce markup into standard HTML.
- The server sends that HTML back to the browser.
- The browser displays the page.
Every time the user performs an action that requires server interaction (clicking a button, submitting a form, sorting a table) the cycle repeats. The browser sends a request, the server processes it, generates new HTML, and sends it back.
This is different from how Aura and LWC work. In those frameworks, most UI logic runs in browser JavaScript. The server is called only when data or business logic is needed. Visualforce often feels slower on highly interactive pages because each action requires a server round trip rather than a client-side state update. In practice, this is one of the main reasons older Visualforce heavy workflows feel more sluggish than equivalent Lightning implementations.
| Characteristic | Visualforce | Aura / LWC |
|---|---|---|
| Rendering | Server generates HTML | Browser renders UI |
| User interaction | Full or partial page refresh | Client-side updates, no page reload |
| Controller logic | Apex runs on the server per request | JavaScript handles UI in the browser; Apex/services run on the server only when called |
| Data binding | Merge fields evaluated server-side | Reactive properties update the DOM |
| State | Managed by ViewState on the server | Managed in browser memory |
📝 Creating a Visualforce Page
Section titled “📝 Creating a Visualforce Page”A Visualforce page is defined by two files: a .page markup file and a .page-meta.xml metadata file. In this guide, we will create and deploy a basic Visualforce page from VS Code using the standard Salesforce DX project structure.
If you need to set up a Salesforce DX project first, follow the tooling and project setup flow in Developer Mindset & Toolkit, then come back here.
🔨 Build It in VS Code (Step by Step)
Section titled “🔨 Build It in VS Code (Step by Step)”- Create the page file (choose one method):
- Method A (recommended): In VS Code Explorer, under
force-app/main/default/pages, right-click thepagesfolder and select SFDX: Create Visualforce Page (Salesforce Extension Pack). EnterHelloVisualforcewhen prompted. - Method B (manual): Create
force-app/main/default/pages/HelloVisualforce.pagemanually.
- Method A (recommended): In VS Code Explorer, under
- Add the markup: Paste the minimal page below into
HelloVisualforce.page. - Check metadata file: Confirm
force-app/main/default/pages/HelloVisualforce.page-meta.xmlexists. If you used Method A, this is usually created for you. If not, create it manually in the same folder. This file defines page properties for deployment. - Add metadata: Set an API version and label using the sample XML below.
- Deploy from VS Code terminal: Make sure you are logged into your org and have a default org set, then run
sf project deploy start --source-dir force-app/main/default/pages. - Open the page in your org: In your browser, open
https://your-org-domain.my.salesforce.com/apex/HelloVisualforce.
📄 A Minimal Page
Section titled “📄 A Minimal Page”<apex:page> <h1>Hello, Visualforce!</h1> <p>This is a simple Visualforce page with no controller.</p></apex:page><?xml version="1.0" encoding="UTF-8"?><ApexPage xmlns="http://soap.sforce.com/2006/04/metadata"> <apiVersion>66.0</apiVersion> <label>HelloVisualforce</label></ApexPage>Every Visualforce page must be wrapped in an <apex:page> tag. Without a controller, the page has no backend logic. Salesforce just renders the markup server-side and sends HTML to the browser.
If you want some more hands-on learning after this first page build, the Visualforce Basics Trailhead module is a strong next step. It walks through page creation, standard controllers, list controllers, forms, and custom controllers in small practical units, which helps cement the concepts before you move into more complex Visualforce maintenance or migration work.
⚙️ A Page with a Standard Controller
Section titled “⚙️ A Page with a Standard Controller”Salesforce provides built-in standard controllers for every standard and custom object. A standard controller gives the page automatic access to a single record’s data (identified by the Id in the URL), plus built-in actions for saving, editing, and deleting, without writing any Apex. Deploy this page using the same steps as above:
<apex:page standardController="Account">    <apex:form>        <apex:pageBlock title="Account Details">            <apex:pageBlockSection>                <apex:outputField value="{!Account.Name}" />                <apex:outputField value="{!Account.Industry}" />                <apex:outputField value="{!Account.AnnualRevenue}" />                <apex:outputField value="{!Account.Phone}" />            </apex:pageBlockSection>
            <apex:pageBlockButtons>                <apex:commandButton action="{!edit}" value="Edit" />            </apex:pageBlockButtons>        </apex:pageBlock>    </apex:form></apex:page>
A few things to notice:
standardController="Account"tells Salesforce to use the built-in Account controller. The page expects an AccountIdin the URL (e.g.,/apex/MyPage?id=001xxxxxxxxxxxx).{!Account.Name}is a merge field expression. The{! }syntax is how Visualforce references data: it is evaluated on the server before the HTML is sent to the browser.<apex:commandButton action="{!edit}">calls the standard controller’s built-ineditaction. No Apex code required.
To try this page quickly with an Account record:
- Deploy the page from VS Code.
- Open an Account record in your org and copy its
Idfrom the URL. - Visit
/apex/YourPageName?id=001...in your org.
📋 Standard List Controllers
Section titled “📋 Standard List Controllers”When you need to display a list of records rather than a single record, use a standard list controller by adding the recordSetVar attribute:
<apex:page standardController="Contact" recordSetVar="contacts"> <apex:pageBlock title="All Contacts"> <apex:pageBlockTable value="{!contacts}" var="con"> <apex:column value="{!con.FirstName}" /> <apex:column value="{!con.LastName}" /> <apex:column value="{!con.Email}" /> </apex:pageBlockTable> </apex:pageBlock></apex:page>The recordSetVar attribute gives you a list variable (contacts) that you can iterate over, and the standard list controller handles pagination automatically.
How the record set gets into the page:
- You do not pass
contactsinto the page yourself. - When the page request starts, Salesforce creates a standard list controller for
Contactbecause ofstandardController="Contact". - Salesforce then queries the current page of records and injects that result into the variable named by
recordSetVar(contacts) before Visualforce evaluates{!contacts}in the markup. - The result set is still constrained by the running user’s access (sharing, CRUD, and FLS), so users only see records and fields they are allowed to access.
In this example, if you open the page without adding your own filter logic:
- The records come from the running user’s default or recent Contact list-view context (often Recently Viewed).
- Only records the user can access are included.
- The order and page size follow standard list controller behaviour.
If you need tighter control over which records appear, use a custom controller (or extension) and query exactly what you need.
🔧 Controllers 101
Section titled “🔧 Controllers 101”Standard controllers cover simple CRUD operations, but real-world pages usually need custom logic. Visualforce offers three controller strategies, and understanding when to use each one is key to reading (and writing) effective pages.
| Strategy | Attribute | Use When |
|---|---|---|
| Standard Controller | standardController="Object" | You only need built-in CRUD on a single record |
| Controller Extension | extensions="ClassName" | You need extra logic but still want standard controller behaviour |
| Custom Controller | controller="ClassName" | You need full control over the page’s data and actions |
🧭 Standard Controllers
Section titled “🧭 Standard Controllers”Standard controllers are the fastest option when your page aligns with Salesforce’s built-in record behaviour. Key points:
- One exists automatically for every standard and custom object.
- For single-record pages, the controller uses the record
Idin the URL to load context. - Provides
save,edit,delete,cancel, andviewactions out of the box. - Respects the running user’s CRUD and FLS permissions automatically.
- Supports list pages via
recordSetVar, using standard list controller behaviour.
🛠️ Custom Controllers
Section titled “🛠️ Custom Controllers”A custom controller is an Apex class you write to provide all logic for a Visualforce page instead of using Salesforce’s built-in standard controller for an object. Use this approach when the page needs data shaping, filtering, workflow actions, or business rules that standard behaviour cannot provide.
This approach gives you full control over what data is accessed, how user actions are handled, and how errors are managed.
public class ExpenseClaimController {    public List<Expense_Claim__c> claims { get; set; }    public String filterStatus { get; set; }
    public ExpenseClaimController() {        filterStatus = 'Submitted';        loadClaims();    }
    public void loadClaims() {        claims = [            SELECT Id, Name, Amount__c, Status__c, CreatedDate            FROM Expense_Claim__c            WHERE Status__c = :filterStatus            ORDER BY CreatedDate DESC            LIMIT 50        ];    }
    public PageReference approveSelected() {        // Custom approval logic would go here        return null; // Stay on the same page    }}
The Visualforce page references it with the controller attribute:
<apex:page controller="ExpenseClaimController">    <apex:form>        <apex:pageBlock title="Expense Claims — {!filterStatus}">            <apex:selectList value="{!filterStatus}" size="1">                <apex:selectOption itemValue="Draft" itemLabel="Draft" />                <apex:selectOption itemValue="Submitted" itemLabel="Submitted" />                <apex:selectOption itemValue="Approved" itemLabel="Approved" />                <apex:actionSupport event="onchange" action="{!loadClaims}"                    reRender="claimsTable" />            </apex:selectList>
            <apex:pageBlockTable value="{!claims}" var="claim" id="claimsTable">                <apex:column value="{!claim.Name}" />                <apex:column value="{!claim.Amount__c}" />                <apex:column value="{!claim.Status__c}" />                <apex:column value="{!claim.CreatedDate}" />            </apex:pageBlockTable>        </apex:pageBlock>    </apex:form></apex:page>
How this example works:
- When the page uses
controller="ExpenseClaimController", Salesforce instantiates that Apex class and uses it for page interactions. - The constructor sets a default filter (
Submitted) and callsloadClaims()so records are ready for first render. filterStatusis a public property with a getter and setter ({ get; set; }), which means the page can read it (to display the current selection) and write it (when the user changes the dropdown). The<apex:selectList value="{!filterStatus}">binding does both: it renders the current value on page load, and updates the property when the user makes a new selection.value="{!claims}"passes the entire list returned by theclaimsproperty to<apex:pageBlockTable>. Thevar="claim"attribute then names the loop variable: for each iteration, Salesforce takes one record from the list and makes it available asclaim. That is why each column expression uses{!claim.Name},{!claim.Amount__c}, and so on,claimis a singleExpense_Claim__crecord, and you access its fields directly.action="{!loadClaims}"runs again when the status dropdown changes, andreRender="claimsTable"refreshes just the table region.
With a custom controller, you are responsible for making security and query design choices in Apex. In practice, that means choosing the right sharing mode, enforcing CRUD/FLS, writing selective SOQL, and keeping your logic limit-safe (avoiding governor limits) so the page stays secure and reliable as data volume grows.
🧩 Controller Extensions
Section titled “🧩 Controller Extensions”A controller extension adds custom Apex behaviour on top of a standard or custom controller without replacing it. Controller extensions are often the safest middle ground because they preserve built-in record behaviour while letting you add targeted logic without fully re-implementing the page lifecycle yourself.
public class AccountExtension {    private final Account account;
    // The constructor receives the standard controller instance    public AccountExtension(ApexPages.StandardController stdController) {        this.account = (Account) stdController.getRecord();    }
    public Integer getOpenCaseCount() {        return [            SELECT COUNT()            FROM Case            WHERE AccountId = :account.Id            AND IsClosed = false        ];    }
public String getRiskLevel() { Integer openCases = getOpenCaseCount(); if (openCases > 10) return 'High'; if (openCases > 5) return 'Medium'; return 'Low'; }}<apex:page standardController="Account" extensions="AccountExtension"> <apex:pageBlock title="{!Account.Name}"> <apex:pageBlockSection> <apex:outputField value="{!Account.Industry}" /> <apex:outputField value="{!Account.Phone}" />
<!-- These come from the extension, not the standard controller --> <apex:pageBlockSectionItem> <apex:outputLabel value="Open Cases" /> <apex:outputText value="{!openCaseCount}" /> </apex:pageBlockSectionItem>
<apex:pageBlockSectionItem> <apex:outputLabel value="Risk Level" /> <apex:outputText value="{!riskLevel}" style="{!IF(riskLevel == 'High', 'color: red; font-weight: bold;', '')}" /> </apex:pageBlockSectionItem> </apex:pageBlockSection> </apex:pageBlock></apex:page>How this example works:
standardController="Account"keeps the built-in Account behaviour and record context. Fields like{!Account.Industry}and{!Account.Phone}come from the standard controller, not the extension.extensions="AccountExtension"tells Salesforce to instantiate your extension class. When it does, it passes the active standard controller instance into the extension’s constructor. This is why the constructor must have the signaturepublic AccountExtension(ApexPages.StandardController stdController)— Visualforce will not wire it up unless the constructor accepts exactly this type.stdController.getRecord()returns the sObject record the standard controller has loaded (in this case the Account identified by theIdin the URL). Because it returns a genericsObject, you cast it toAccountwith(Account)so you can access Account-specific fields likeaccount.Idin your queries.- Visualforce exposes getter methods from both the extension and the standard controller. For example,
getOpenCaseCount()becomes{!openCaseCount}andgetRiskLevel()becomes{!riskLevel}. If a property name exists in both, the extension’s version takes precedence. - The inline expression
{!IF(riskLevel == 'High', 'color: red; font-weight: bold;', '')}on thestyleattribute is evaluated server-side. It callsgetRiskLevel()and applies a CSS string conditionally. Keeping simple display logic like this in the markup is fine; anything more complex should live in the controller.
To summarise: use extensions when you want to add or enhance behaviour on top of the standard controller — not when you need to replace all standard logic (in that case, use a custom controller instead).
🎨 Essential Components
Section titled “🎨 Essential Components”Visualforce pages are built from server-side components: special tags for layout, data display, and user actions that Salesforce renders into HTML. You do not need to memorise every component, but understanding the main categories helps you quickly identify what a page is showing, what data it is bound to, and which elements trigger controller logic.
📐 Layout Components
Section titled “📐 Layout Components”| Component | Purpose |
|---|---|
<apex:page> | The root container; every page starts here |
<apex:pageBlock> | A styled section with a header and optional buttons |
<apex:pageBlockSection> | A two-column layout within a pageBlock |
<apex:pageBlockTable> | A data table with built-in Salesforce styling |
<apex:form> | Wraps interactive elements that need to send data to the controller |
<apex:outputPanel> | A container for grouping elements; supports conditional rendering and reRender targeting |
<apex:panelGrid> | A grid layout rendered as an HTML table |
🗂️ Data Components
Section titled “🗂️ Data Components”| Component | Purpose |
|---|---|
<apex:outputField> | Displays a field value with the correct format (currency, date, etc.) |
<apex:inputField> | An editable input that automatically matches the field type |
<apex:inputText> | A plain text input bound to a controller property |
<apex:outputText> | Renders text or an expression |
<apex:repeat> | Iterates over a collection (similar to for:each in LWC) |
<apex:variable> | Declares a local variable in the page scope |
<apex:selectList> / <apex:selectOption> | Dropdown menus bound to controller properties |
▶️ Action Components
Section titled “▶️ Action Components”| Component | Purpose |
|---|---|
<apex:commandButton> | A button that calls a controller action |
<apex:commandLink> | A hyperlink that calls a controller action |
<apex:actionFunction> | Exposes a controller method as a JavaScript function |
<apex:actionSupport> | Attaches a controller action to a DOM event (e.g., onchange) |
<apex:actionPoller> | Calls a controller action on a timed interval |
<apex:actionStatus> | Shows loading indicators while an AJAX action is in progress |
<apex:actionRegion> | Limits which form fields are submitted during an action |
The full Visualforce component reference library is available in the official docs. Bookmark it: when you are reading a legacy page, this is where you will look up unfamiliar tags.
🧬 Data Binding Patterns
Section titled “🧬 Data Binding Patterns”This is the part most people find slippery at first. It gets concrete the moment you trace where a single value on the page actually comes from.
Visualforce data binding revolves around merge field expressions: {! expression }. Think of these as placeholders in the markup that Salesforce resolves on the server before the page is sent to the browser, using values from record context or controller properties.
In practice, debugging gets much easier once you can answer one question quickly: “Where is this value coming from?”
🧾 Record Fields vs Controller Properties
Section titled “🧾 Record Fields vs Controller Properties”Most expressions come from one of two places:
1. Record fields (via standard controller context):
<!-- Binds directly to a field on the record loaded by the standard controller --><apex:outputField value="{!Account.Name}" /><apex:outputField value="{!Account.Owner.Email}" /> <!-- relationship traversal -->2. Controller properties (via custom controller or extension):
<!-- Binds to a property defined in your Apex class --><apex:outputText value="{!totalRevenue}" /><apex:inputText value="{!searchKeyword}" />Quick reading rule:
- If you see
{!Object.Field}or{!Object.Relationship.Field}, it is record data from standard controller context. - If you see
{!propertyName}, it is a controller or extension property.
That simple distinction helps you decide where to look next: page context and object fields, or Apex logic.
🧮 Getters and Setters
Section titled “🧮 Getters and Setters”Visualforce uses JavaBean naming conventions to resolve expressions. When the page references {!openCaseCount}, Visualforce looks for getOpenCaseCount() in the controller.
For form inputs such as <apex:inputText value="{!searchKeyword}" />, the flow is:
- Visualforce reads the value using a getter during render.
- The user changes the value in the browser.
- On submit or AJAX request, Visualforce sends the value back to the server and calls the setter.
Visualforce does not do real-time two-way binding in the browser. Values are updated on the server during a postback or AJAX request, then re-rendered into the page.
That request/response round-trip between page and controller is the core Visualforce binding model.
public class MyController {    // Approach 1: Automatic property (getter + setter via shorthand)    public String searchKeyword { get; set; }
    // Approach 2: Explicit getter (read-only in the page)    public Integer getRecordCount() {        return [SELECT COUNT() FROM Case WHERE IsClosed = false];    }
// Approach 3: Explicit getter and setter (full control) private String status; public String getStatus() { return this.status; } public void setStatus(String value) { this.status = value?.trim(); }}| Pattern | Page Expression | Writeable? | Use Case |
|---|---|---|---|
public String name { get; set; } | {!name} | Yes | Form inputs |
public String getName() { ... } | {!name} | No | Computed/derived values |
public void setName(String v) | (paired with getter) | Yes | Validation on assignment |
🔁 Collections and Iteration
Section titled “🔁 Collections and Iteration”When a controller exposes a list, you can iterate with <apex:repeat> or <apex:pageBlockTable>:
public List<Contact> getTeamMembers() { return [SELECT Name, Email, Title FROM Contact WHERE AccountId = :accountId];}<apex:repeat value="{!teamMembers}" var="member"> <p>{!member.Name} — {!member.Title}</p></apex:repeat>Use <apex:repeat> for lightweight custom markup. Use <apex:pageBlockTable> when you want standard Salesforce table styling with less custom HTML.
🖱️ User Interactions: Postback and Partial Refresh
Section titled “🖱️ User Interactions: Postback and Partial Refresh”Every user interaction in Visualforce that triggers server logic follows one of two patterns: a full postback or a partial refresh. If you have ever clicked a button on a Visualforce page and watched the entire page go blank for a moment before reloading, that was a full postback. If only one section of the page updated while everything else stayed still, that was a partial refresh. Both patterns are common in legacy pages, and recognising them helps you debug slow behaviour and understand what the controller is actually doing on each interaction.
🧱 Full Postback
Section titled “🧱 Full Postback”A full postback is the default. When a user clicks an <apex:commandButton> or <apex:commandLink>, the browser packages up the entire form (including the ViewState) and sends it to the server. The controller processes the request, the server re-renders the complete page, and the browser replaces the old page with the new one.
<apex:commandButton action="{!save}" value="Save Record" />For simple save-and-redirect flows this is perfectly fine, but on pages with lots of data it can feel slow because everything is rebuilt and reloaded every time the user clicks.
🪟 Partial Refresh (AJAX)
Section titled “🪟 Partial Refresh (AJAX)”A partial refresh still sends a server request and runs the full controller lifecycle, but only re-renders a targeted section of the page rather than rebuilding everything. The key is the reRender attribute, which points to the id of a container component such as <apex:outputPanel>:
<apex:commandButton action="{!loadClaims}" value="Refresh"    reRender="claimsPanel" status="loadingStatus" />
<apex:actionStatus id="loadingStatus">    <apex:facet name="start">        <span class="loading">Loading...</span>    </apex:facet></apex:actionStatus>
<apex:outputPanel id="claimsPanel">    <!-- Only this section is refreshed -->    <apex:pageBlockTable value="{!claims}" var="c">        <apex:column value="{!c.Name}" />    </apex:pageBlockTable></apex:outputPanel>
Let’s walk through this exact example from start to finish:
- The user clicks Refresh.
- Because the button has
action="{!loadClaims}", Visualforce sends a request to the server and callsloadClaims()in the controller. - If the request takes time,
status="loadingStatus"activates<apex:actionStatus>, so the Loading… message appears while the request is in progress. - The controller method updates the
claimslist. reRender="claimsPanel"tells Salesforce to re-render only the markup inside<apex:outputPanel id="claimsPanel">.- The browser swaps just that panel with the returned HTML, so the table updates without a full page reload.
The important connection is direct: reRender="claimsPanel" must match id="claimsPanel" on the output panel.
Key components for partial refresh:
| Component | Role |
|---|---|
reRender="targetId" | Tells Salesforce which panel to refresh — must match the panel’s id |
<apex:outputPanel> | The most common refresh target; wrap the content you want to update in this component and give it an id |
<apex:actionSupport> | Triggers an action on a DOM event (e.g., onchange, onclick) |
<apex:actionFunction> | Exposes a controller method as a callable JavaScript function |
<apex:actionRegion> | Limits which fields are submitted during the request, reducing ViewState processing |
<apex:actionStatus> | Shows a loading indicator while the AJAX request is in progress |
🌀 The Postback Lifecycle
Section titled “🌀 The Postback Lifecycle”Whether a request is a full postback or partial refresh, the server follows the same sequence. Knowing this order is useful when something unexpected happens, for example, why a setter runs before your action method, or why getter values can appear stale until after the action completes.
- User clicks a button or triggers an event.
- The browser submits the form data and the encrypted ViewState.
- Salesforce decrypts the ViewState and restores the controller’s state.
- Setter methods run for any bound input fields that changed.
- The action method executes.
- Getter methods run to prepare data for rendering.
- The page (or targeted panel) is re-rendered and sent back.
🔒 Security for Visualforce and Apex
Section titled “🔒 Security for Visualforce and Apex”A Visualforce page can read and write records, so a careless controller can hand a user data they should never see. Most of the security work here is making your code respect the same limits the rest of the org already enforces.
👥 Sharing and Record Access
Section titled “👥 Sharing and Record Access”Apex sharing controls which records your controller code can see when it runs. A useful question to ask is: “Will this class respect the same record visibility the current user has in the UI, or will it run with broader access?”
In practice, this decision is one of the most important security choices in Visualforce code. For user-facing controllers, I recommend treating with sharing or inherited sharing as the default starting point unless you have a specific, reviewed reason to widen access. Avoid leaving sharing behaviour implicit, because inherited context can create visibility surprises that are hard to spot during development and even harder to explain in production.
If you want a deeper refresher on how Salesforce record access works, revisit Salesforce Fundamentals: Sharing and Access Model and the sharing-context discussion in Salesforce Development Fundamentals: Apex Fundamentals.
Apex classes can run in three sharing modes:
| Mode | Declaration | Behaviour |
|---|---|---|
| With sharing | public with sharing class MyCtrl | Respects the running user’s sharing rules, role hierarchy, and record ownership |
| Without sharing | public without sharing class MyCtrl | Ignores sharing; sees all records regardless of the user’s access |
| Inherited | public inherited sharing class MyCtrl | Inherits the sharing mode of the calling class; defaults to with sharing if called at the top level |
🔐 CRUD and FLS Enforcement
Section titled “🔐 CRUD and FLS Enforcement”Pages using standard controllers respect the running user’s create, read, update, delete (CRUD) and field-level security (FLS) automatically. Custom controllers and extensions run in system mode for object and field access, meaning they bypass CRUD/FLS by default.
You must enforce these checks manually:
public class SecureExpenseController {    public List<Expense_Claim__c> getClaims() {        // Check object-level read access        if (!Schema.sObjectType.Expense_Claim__c.isAccessible()) {            throw new AuraHandledException('You do not have access to Expense Claims.');        }
        // Check field-level access before including sensitive fields        String query = 'SELECT Id, Name, Status__c';        if (Schema.sObjectType.Expense_Claim__c.fields.Amount__c.isAccessible()) {            query += ', Amount__c';        }        query += ' FROM Expense_Claim__c ORDER BY CreatedDate DESC LIMIT 50';
return Database.query(query); }}🕸️ Cross-Site Scripting (XSS)
Section titled “🕸️ Cross-Site Scripting (XSS)”Cross-Site Scripting (XSS) happens when untrusted input is rendered in the page without the right encoding, allowing attacker-supplied JavaScript to run in another user’s browser. In a Salesforce org, that can mean stolen session context, unexpected UI actions, or manipulated page content.
Visualforce helps by encoding output automatically in many component contexts, but the protection is context-specific. The practical rule is simple: encode for where the value is being rendered (HTML, JavaScript, or URL).
Safe by default: Most Visualforce components, such as <apex:outputText>, automatically HTML-encode merge field expressions. Not all components do, so check component behaviour when you are unsure.
Dangerous patterns to avoid:
<!-- UNSAFE: unescaped output in raw HTML --><div>{!userInput}</div>
<!-- SAFE: use the component, which auto-encodes --><apex:outputText value="{!userInput}" />
<!-- SAFE: if you must use raw HTML, encode explicitly --><div>{!HTMLENCODE(userInput)}</div>
<!-- For JavaScript contexts, use JSENCODE --><script>    var name = '{!JSENCODE(contactName)}';</script>
A common mistake is using the right value with the wrong encoder. For example, HTMLENCODE() is correct for HTML body output, but not for JavaScript string contexts where JSENCODE() is required.
| Context | Encoding Function |
|---|---|
| HTML body | HTMLENCODE() |
| JavaScript string | JSENCODE() |
| URL parameter | URLENCODE() |
Inside most Visualforce components (e.g., <apex:outputText>) | Automatic (HTML-encoded) |
| Raw HTML or non-encoding contexts | Use the appropriate encoding function |
🛡️ Cross-Site Request Forgery (CSRF)
Section titled “🛡️ Cross-Site Request Forgery (CSRF)”CSRF attacks trick a logged-in user into submitting an unintended action. Salesforce mitigates this by embedding a unique token in every Visualforce form submission. As long as you use standard Visualforce form components (<apex:form>, <apex:commandButton>), CSRF protection is automatic.
Do not bypass this by constructing raw HTML forms that submit to Salesforce action URLs without the platform’s token.
🚫 SOQL Injection
Section titled “🚫 SOQL Injection”SOQL injection happens when untrusted input changes the structure of your query instead of being treated as data. In practice, this can expose records the user should not see, bypass intended filters, or cause unexpected query behaviour.
In Visualforce controllers, the safest default is: use bind variables whenever possible and avoid concatenating user input into query strings.
If you build SOQL queries using string concatenation with user input, you open the door to SOQL injection:
// VULNERABLE: user can manipulate the queryString query = 'SELECT Id, Name FROM Account WHERE Name = \'' + userInput + '\'';
// SAFE: use bind variablesList<Account> accounts = [SELECT Id, Name FROM Account WHERE Name = :userInput];
// SAFE: use String.escapeSingleQuotes() if dynamic SOQL is unavoidableString safe = String.escapeSingleQuotes(userInput);String query = 'SELECT Id, Name FROM Account WHERE Name = \'' + safe + '\'';If you are building or reviewing Visualforce and Apex code, keep these Secure Coding Guidelines close by. They provide Salesforce’s authoritative recommendations for preventing common vulnerabilities such as XSS, SOQL injection, and CSRF, and they are a useful checklist before deployment.
⚡ Performance and Limits
Section titled “⚡ Performance and Limits”Visualforce pages run server-side, which means every interaction is a server transaction that consumes platform resources. That includes CPU time, SOQL and DML limits, heap usage, and ViewState processing. Understanding these limits helps you build (and fix) pages that stay fast and reliable under load.
🧠 ViewState: The 170KB Ceiling
Section titled “🧠 ViewState: The 170KB Ceiling”The ViewState is a hidden, encrypted form field that preserves the controller’s state between requests. It contains the values of all non-transient instance variables in your controller and extensions.
Why it matters: If the ViewState exceeds 170KB, the page throws an error and becomes unusable. Large list variables and deeply nested objects are common culprits.
Optimisation strategies:
| Strategy | How It Helps |
|---|---|
Mark variables as transient | Excludes them from ViewState entirely |
| Paginate large lists | Reduces the number of records stored at once |
Use <apex:actionRegion> | Limits which fields are submitted, reducing processing |
| Move read-only data to getter methods | Data fetched in a getter isn’t stored in ViewState |
| Avoid wrapper classes with many fields | Each field on each wrapper instance consumes ViewState |
public class OptimisedController {    // Stored in ViewState (needed between requests)    public String filterStatus { get; set; }    public Integer currentPage { get; set; }
    // NOT stored in ViewState (re-fetched each time)    transient public List<Expense_Claim__c> claims;
    public List<Expense_Claim__c> getClaims() {        if (claims == null) {            claims = [                SELECT Id, Name, Amount__c, Status__c                FROM Expense_Claim__c                WHERE Status__c = :filterStatus                LIMIT 20 OFFSET :((currentPage - 1) * 20)            ];        }        return claims;    }}
📏 Governor Limits in Controllers
Section titled “📏 Governor Limits in Controllers”Every Visualforce page request runs as a single synchronous Apex transaction. This means constructors, action methods, and getters all share the same set of governor limits for that request. Any SOQL or DML operation in your controller counts toward these limits.
If you want a deeper walkthrough of how these limits work and why bulk patterns matter, see Governor Limits: The rules of the multitenancy.
For Visualforce controllers, the most relevant synchronous limits are:
| Limit | Value | Impact |
|---|---|---|
| SOQL queries per transaction | 100 | Queries executed from constructors, actions, or getters all count |
| DML statements per transaction | 150 | May fail if you perform too many DML operations in one request (for example, saving in a loop) |
| CPU time | 10,000 ms | Complex calculations or inefficient loops |
| Heap size | 6 MB (sync) | Large collections in memory |
☑️ Performance Optimisation Checklist
Section titled “☑️ Performance Optimisation Checklist”Use this checklist when reviewing or troubleshooting a slow Visualforce page:
- Are large data sets paginated rather than loaded all at once?
- Are controller variables that do not need to persist across requests marked
transient? - Are SOQL queries selective (indexed filters, LIMIT clauses)?
- Is
<apex:actionRegion>used to scope updates and avoid unnecessary processing? - Are there unnecessary
<apex:actionPoller>components firing too frequently? - Does the page avoid SOQL inside loops (in getters or action methods)?
- Is the ViewState under 170KB? (Check using the View State Inspector in Developer Console.)
- Are
renderedattributes used to avoid generating HTML for hidden sections?
If this checklist is consistently green, most Visualforce pages stay stable and responsive even as usage grows. With that performance foundation in place, the next consideration is how those pages behave once they run inside Lightning Experience.
🌩️ Visualforce in Lightning Experience
Section titled “🌩️ Visualforce in Lightning Experience”When a Visualforce page runs inside Lightning Experience, it is served inside an iframe. That iframe boundary creates visual and functional isolation from the surrounding Lightning shell, which affects styling, component interaction, and data exchange.
📘 Compatibility Checklist
Section titled “📘 Compatibility Checklist”Before embedding a Visualforce page in Lightning, verify the following:
| Concern | What to Check |
|---|---|
| Lightning Stylesheets | Enable lightningStylesheets="true" on <apex:page> to apply SLDS like styling, then verify visual differences carefully. |
| Header and Sidebar | Do not rely on showHeader and sidebar; Lightning provides its own shell navigation. |
| JavaScript libraries | Test jQuery and other DOM manipulating libraries carefully across the iframe boundary. |
| window.location | Remember window.location only navigates the iframe. Use sforce.one.navigateToURL() to navigate the outer Lightning shell. |
| URL parameters | Validate URL-hack behaviour in Lightning. Use lightning:isUrlAddressable or alternative patterns where needed. |
| Session ID | Treat {!$Api.Session_ID} as different in Lightning context, and avoid relying on it for cross-domain calls. |
| Page height | Set explicit heights in Lightning App Builder because iframes do not auto-resize. |
| Console apps | In Lightning console (Service Console), handle workspace events differently for Visualforce pages in tabs or utility items. |
🔌 Communication Between Visualforce and Lightning
Section titled “🔌 Communication Between Visualforce and Lightning”In Lightning Experience, separate this into three concerns: navigation, same page UI messaging, and server-side event communication.
- Use
sforce.onefor navigation when a Visualforce page is embedded in Lightning. - Use Lightning Message Service (LMS) for messaging between Visualforce, Aura, and LWC on the same page.
- Use Platform Events when you need server-to-client publish/subscribe updates.
// Inside a Visualforce page, use sforce.one API for navigationsforce.one.navigateToSObject('{!Account.Id}');The sforce.one API remains the primary navigation approach from a Visualforce iframe in Lightning. For cross-component messaging on the same page, LMS remains the recommended option across Visualforce, Aura, and LWC.
🧷 Where Visualforce Still Fits in Lightning
Section titled “🧷 Where Visualforce Still Fits in Lightning”Even within Lightning Experience, Visualforce remains the only practical option for certain use cases:
PDF Generation: Setting renderAs="pdf" on <apex:page> renders the page as a downloadable PDF. Currently, there is no direct LWC equivalent for this pattern.
Here is a minimal example that shows the core pattern clearly:
<apex:page standardController="Invoice__c" renderAs="pdf" showHeader="false" sidebar="false"> <h1>Invoice {!Invoice__c.Name}</h1> <p> Date: <!-- Formats the date as day/month/year --> <apex:outputText value="{0,date,dd/MM/yyyy}"> <apex:param value="{!Invoice__c.Invoice_Date__c}" /> </apex:outputText> </p> <p>Total: <apex:outputField value="{!Invoice__c.Total_Amount__c}" /></p></apex:page>From there, you can add custom HTML, CSS, and related lists or line-item tables as your PDF layout grows.
Visualforce Email Templates: Dynamic, data-driven emails with related lists, conditional content, and complex formatting:
<messaging:emailTemplate subject="Your Expense Claim {!relatedTo.Name}"                         recipientType="User"                         relatedToType="Expense_Claim__c">    <messaging:htmlEmailBody>        <p>Hi {!recipient.FirstName},</p>        <p>Your expense claim <strong>{!relatedTo.Name}</strong> for           <apex:outputField value="{!relatedTo.Amount__c}" />           has been {!relatedTo.Status__c}.</p>
        <apex:outputPanel rendered="{!relatedTo.Status__c == 'Rejected'}">            <p style="color: red;">                Reason: {!relatedTo.Rejection_Reason__c}            </p>        </apex:outputPanel>    </messaging:htmlEmailBody></messaging:emailTemplate>
Custom Button Overrides and Embedded Pages: Some orgs override standard actions with Visualforce or embed pages in Lightning Record Pages via the Lightning App Builder. These patterns remain functional and sometimes the simplest option for specific workflows.
If you want guided practice for this exact topic, the Visualforce & Lightning Experience Trailhead module is worth doing before implementation work. It focuses on how Visualforce behaves inside Lightning Experience, including styling, navigation, and compatibility patterns that commonly cause issues in real orgs.
🧪 Capstone Build: Searchable Contact List with Pagination
Section titled “🧪 Capstone Build: Searchable Contact List with Pagination”Let’s pull this together into one page you’d actually recognise in a real org. This capstone builds a searchable, paginated contact list: a pattern you will encounter (and need to maintain) in many Salesforce orgs.
🏛️ The Controller
Section titled “🏛️ The Controller”public with sharing class ContactSearchController { public String searchTerm { get; set; } public Integer pageSize { get; set; } public Integer pageNumber { get; set; } transient public List<Contact> contacts;
public ContactSearchController() { pageSize = 10; pageNumber = 1; searchTerm = ''; }
public List<Contact> getContacts() { if (contacts == null) { String safeSearch = '%' + String.escapeSingleQuotes(searchTerm) + '%'; contacts = [ SELECT Id, FirstName, LastName, Email, Phone, Account.Name FROM Contact WHERE Name LIKE :safeSearch WITH USER_MODE ORDER BY LastName ASC LIMIT :pageSize OFFSET :((pageNumber - 1) * pageSize) ]; } return contacts; }
public Integer getTotalRecords() { String safeSearch = '%' + String.escapeSingleQuotes(searchTerm) + '%'; return [SELECT COUNT() FROM Contact WHERE Name LIKE :safeSearch WITH USER_MODE]; }
public Integer getTotalPages() { return (Integer) Math.ceil((Decimal) getTotalRecords() / pageSize); }
public Boolean getHasPrevious() { return pageNumber > 1; }
public Boolean getHasNext() { return pageNumber < getTotalPages(); }
public void doSearch() { pageNumber = 1; contacts = null; }
public void nextPage() { pageNumber++; contacts = null; }
public void previousPage() { pageNumber--; contacts = null; }}🖼️ The Visualforce Page
Section titled “🖼️ The Visualforce Page”<apex:page controller="ContactSearchController" lightningStylesheets="true"> <apex:form> <apex:pageBlock title="Contact Search"> <apex:pageBlockSection columns="1"> <apex:pageBlockSectionItem> <apex:outputLabel value="Search" /> <apex:outputPanel> <apex:inputText value="{!searchTerm}" /> <apex:commandButton action="{!doSearch}" value="Search" reRender="resultsPanel" status="searchStatus" /> </apex:outputPanel> </apex:pageBlockSectionItem> </apex:pageBlockSection>
<apex:actionStatus id="searchStatus"> <apex:facet name="start"> <p><em>Searching...</em></p> </apex:facet> </apex:actionStatus>
<apex:outputPanel id="resultsPanel"> <apex:pageBlockTable value="{!contacts}" var="c" rendered="{!contacts.size > 0}"> <apex:column headerValue="Name"> <apex:outputLink value="/{!c.Id}">{!c.FirstName} {!c.LastName}</apex:outputLink> </apex:column> <apex:column value="{!c.Email}" /> <apex:column value="{!c.Phone}" /> <apex:column value="{!c.Account.Name}" headerValue="Account" /> </apex:pageBlockTable>
<apex:outputPanel rendered="{!contacts.size == 0}"> <p>No contacts found.</p> </apex:outputPanel>
<apex:panelGrid columns="3" style="margin-top: 10px;"> <apex:commandButton action="{!previousPage}" value="« Previous" disabled="{!NOT(hasPrevious)}" reRender="resultsPanel" /> <apex:outputText value="Page {!pageNumber} of {!totalPages}" /> <apex:commandButton action="{!nextPage}" value="Next »" disabled="{!NOT(hasNext)}" reRender="resultsPanel" /> </apex:panelGrid> </apex:outputPanel> </apex:pageBlock> </apex:form></apex:page>📌 What This Demonstrates
Section titled “📌 What This Demonstrates”| Concept | Where It Appears |
|---|---|
| Custom controller | controller="ContactSearchController" |
| Data binding (properties + getters) | {!searchTerm}, {!contacts}, {!totalPages} |
| Partial refresh | reRender="resultsPanel" on both buttons |
| Action status indicator | <apex:actionStatus id="searchStatus"> |
| Security | with sharing, WITH USER_MODE, String.escapeSingleQuotes() |
| ViewState optimisation | transient contacts list, pagination with LIMIT/OFFSET |
| Lightning compatibility | lightningStylesheets="true" |
🐛 Debugging and Troubleshooting
Section titled “🐛 Debugging and Troubleshooting”When a Visualforce page misbehaves, Salesforce provides tools to help you diagnose the problem.
📎 The Development Mode Footer
Section titled “📎 The Development Mode Footer”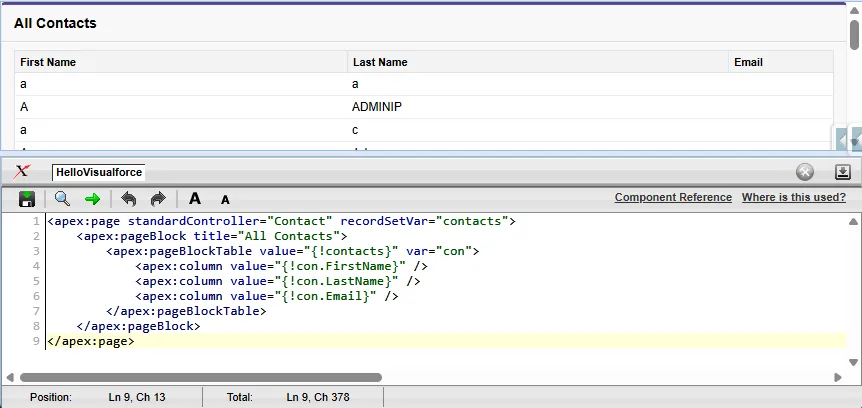
Enable Development Mode in your user settings (Setup → Users → Edit your user → Development Mode checkbox). If the checkbox is unavailable, ask an admin for the Customize Applications system permission. Once enabled, every Visualforce page you visit shows a footer panel at the bottom with:
- A link to view and edit the page’s markup directly.
- The page’s ViewState size.
- A link to the controller class.
- A quick reference to component attributes.
This is the fastest way to inspect a page in the browser without switching to VS Code or Developer Console.
🔍 View State Inspector
Section titled “🔍 View State Inspector”The View State tab in the Development Mode footer shows exactly what is consuming your ViewState:
- Total ViewState size (target: well under 170KB).
- A breakdown by variable, showing which controller properties are the largest.
- Hints about which variables to mark as
transient.
🪵 Debug Logs
Section titled “🪵 Debug Logs”Debug Logs capture a detailed execution trace of Apex code running on the server, including every SOQL query, DML statement, variable assignment, and exception that occurs during a transaction. When a Visualforce page misbehaves, whether due to governor limit hits, unexpected data, a null pointer exception, or slow query performance, debug logs are your primary window into what the server actually did. Unlike the browser’s developer tools, which can only see the rendered HTML sent back, debug logs show you the Apex execution path, which is essential for diagnosing server-side issues.
Salesforce provides three ways to work with debug logs. Setup → Debug Logs is where you enable trace flags for a user or class, and view or download captured logs directly. For deeper analysis, the Developer Console (Setup → Developer Console) offers a more feature-complete space for inspecting logs. For a modern, in-context experience, the Salesforce Web Console (Beta) (available from April 2026 onwards) provides browser-native debug log viewing. All three access the same underlying logs; choose based on your workflow.
- Enable logging: Go to Setup → Debug Logs and add a trace flag for your user. Select appropriate log levels (DEBUG for detailed tracing, INFO for a lighter touch).
- Reproduce the issue: Perform the action that causes the problem on your Visualforce page. The server will capture the entire execution trace.
- View or download the log: Open the log in Setup → Debug Logs (view and download), Developer Console (deeper analysis and filtering), or Salesforce Web Console (modern browser-native interface). Filter by
USER_DEBUG,EXCEPTION_THROWN,SOQL_EXECUTE_BEGIN, orDML_BEGINevents to isolate the relevant section.
🚨 Common Error Messages and Fixes
Section titled “🚨 Common Error Messages and Fixes”| Error | Likely Cause | Fix |
|---|---|---|
| ”Maximum view state size limit (170KB) exceeded” | Too much data in controller instance variables | Mark collections as transient; paginate results |
| ”Too many SOQL queries: 101” | Queries inside a loop or too many getter calls | Move queries out of loops; cache results in a variable |
| ”Attempt to dereference a null object” | A variable or relationship field is null | Add null checks in the controller or use rendered to hide the section |
| ”SObject row was retrieved via SOQL without querying the requested field” | The SOQL query did not include a field used in the page | Add the missing field to your SELECT clause |
| ”Visualforce Remoting: Unable to connect” | JavaScript remoting endpoint misconfigured | Verify the @RemoteAction method is static and public (or global for managed-package cross-namespace access) |
🌐 Browser Developer Tools
Section titled “🌐 Browser Developer Tools”Browser developer tools (F12) are still valuable for client-side troubleshooting in Visualforce. They do not replace Debug Logs for Apex execution details, but they help you diagnose rendering and request issues quickly.
- Inspect the generated HTML to confirm what Visualforce actually rendered (especially conditional sections and component IDs).
- Monitor XHR/network activity during partial refreshes to validate request timing, status codes, and failed responses.
- Check the JavaScript console for client-side errors, especially with
<apex:actionFunction>, remoting calls, or custom scripts. - Inspect the hidden
__VIEWSTATEfield to spot growth trends; use the View State Inspector for detailed variable-level breakdown.
🔄 Migration Considerations: Visualforce to LWC
Section titled “🔄 Migration Considerations: Visualforce to LWC”When evaluating whether to migrate a Visualforce page to LWC, consider these factors:
| Factor | Keep in Visualforce | Migrate to LWC |
|---|---|---|
| PDF generation | ✅ No LWC equivalent | |
| VF email templates | ✅ Still the dynamic email option | |
| Simple record display | ✅ Use standard Lightning components | |
| Complex interactive forms | ✅ Much better UX in LWC | |
| Heavy user interaction | ✅ Client-side rendering is faster | |
| Embedded in Lightning pages | Works, but iframe-based | ✅ Native Lightning integration |
| Page with minimal traffic | ✅ Low ROI on migration |
🛤️ The Migration Pattern
Section titled “🛤️ The Migration Pattern”If you do decide to migrate, the overall pattern is still “move server-side controller logic into reusable Apex services and rebuild the UI in a component framework,” but this is rarely a quick lift-and-shift. The conceptual gap is larger than Aura-to-LWC because Visualforce is server-rendered while LWC is client-rendered, so teams typically need phased delivery, regression testing, and UX redesign rather than a direct one-to-one rewrite:
- Identify and service-extract controller logic. Controller methods often need refactoring into reusable
@AuraEnabledApex services that your LWC calls via@wireor imperatively. - Map the markup and interaction behaviour. Visualforce components map roughly to Lightning base components or standard HTML, but interaction patterns often need redesign rather than direct replacement:
| Visualforce | LWC Equivalent |
|---|---|
<apex:pageBlock> | <lightning-card> |
<apex:pageBlockTable> | <lightning-datatable> |
<apex:inputField> | <lightning-input-field> (inside a record form) |
<apex:commandButton> | <lightning-button> |
<apex:outputField> | <lightning-output-field> (inside a record form) |
{!Account.Name} | {account.data.fields.Name.value} or bound property |
<apex:repeat> | for:each directive |
- Rethink the interaction model and release plan. In Visualforce, every action is a server round-trip. In LWC, you can validate inputs, update the UI, and manage state on the client, only calling the server when needed. In practice, most teams migrate page-by-page behind feature flags or phased rollouts to reduce risk.
If you want practical migration practice, the Quick Start: Explore the Visualforce to LWC Sample App Trailhead quick start is a strong next step. It uses short, bite-sized examples to help you learn how Visualforce pages are replaced with LWC patterns in real scenarios.
✅ Summary and Next Steps
Section titled “✅ Summary and Next Steps”Visualforce is a server-side rendering framework where every user interaction triggers a round-trip to Salesforce’s servers. While it is no longer the first choice for new UI development, it remains relevant in specific scenarios, and you’ll still meet it in plenty of established orgs.
Key takeaways from this article:
- Visualforce renders HTML on the server and sends it to the browser. The ViewState preserves controller state between requests.
- Standard controllers give you free CRUD behaviour. Extensions add custom logic. Custom controllers give full control but require manual security enforcement.
- Data binding uses
{! }merge field expressions resolved by JavaBean-style getters and setters. - Partial refresh (
reRender) avoids full page reloads but still executes on the server. - Security requires explicit attention: use
with sharing, enforce CRUD/FLS (orWITH USER_MODE), encode output to prevent XSS, and never concatenate user input into SOQL. - The 170KB ViewState limit is the most common performance issue. Use
transientvariables and pagination to stay within bounds. - In Lightning Experience, Visualforce runs in an iframe with specific navigation and styling considerations.
- Visualforce remains the platform standard for PDF generation and dynamic email templates.
- Migrating from Visualforce to LWC is usually a phased modernisation effort, not a one-to-one rewrite.
Where to go next: The next article in this series covers Aura Components, the framework that bridged the gap between Visualforce’s server-rendered model and LWC’s client-side architecture. Understanding Aura helps complete the legacy UI timeline before moving fully into modern LWC patterns.